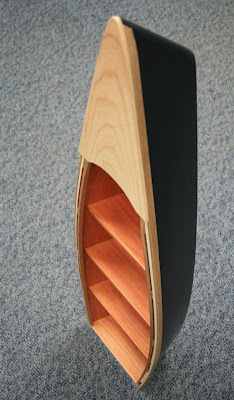
Long time without an update. I've been busy, tis' the season you know. Christmas and the making of gifts for people has provided a good break from the bike for me these past couple years. In the next several posts I'll show what I've been working on, now that the gifts have been given. I didn't want to risk ruining surprises by posting anything earlier.
First off, I found a set of plans published in Wood Magazine back in 1995 for a "nautical shelf". KT and I thought this would be a good gift for her parents, as it would look nice in the house her parents are building in White Mountains of New Hampshire. As I worked on this project I took pictures with my cell phone, so I have a play by play for this gift.
To begin, I prepared Poplar pieces for the back, three shelves, and transom. In this picture the back is being laid out per the plans.
The back is cut with a 15 degree bevel on its outer edges. I tilted the base on my jigsaw to make the cuts.
The shelves were cut to width, with 15 degree angles on each end. The shelves were glued and screwed to the back at their designated heights.
The sides of the boat shelf were laid out with a similar technique to the back. The shape of the sides will allow it to correctly "wrap" onto the back and shelves.
Prior to attaching the sides I dyed the interior of the shelf. I figured it would be easier to apply the dye, and sand the subsequently raised grain, while the shelf was in pieces. The water based dye shouldn't interfere with the glue to be applied.
The sides were wrestled onto the shelf and attached with glues and wood screws driven into the back and shelves.
As can be seen in the above picture, the bow of the boat remained to be closed up after the sides were attached. I temporarily glued a couple blocks to the outside of the boat so the bow could be pinched together with spring clamps. An epoxy fillet was applied to the inside of the boat to adhere the sides to each other.
Next step was to fill all the screw holes and begin the sanding process. It officially looks like a boat now.
Inner and outer gunwales, made of Red Oak, were installed by gluing them to the sides of the boat. I now understand why you see so many clamps in pictures of boat building shops.
The foredeck, made of Ash was the last piece to be attached. It was roughly cut to shape on the bandsaw and would be sanded flush with the outer gunwales was the glue dried.
And now the pictures jump ahead to the finishing room. There was a great deal of sanding between the above and below pictures. The gunwales were sanded flush with each other along the edge of the sides. At the front of the boat the sides were sanded into a smooth, rounded bow. I've never spent so much time with an angle grinder and 80 grit sanding disc as I did on this project. The gunwales are masked off to apply primer to the back and outer sides of the shelf.
After two coats of primer and sanding between coats, the first coat of black enamel goes on.
Now it's time to focus on the inside. The black sides are masked off and lacquer was sprayed on the inside and gunwales. I ended up laying on 6 coats of gloss lacquer.
After drying overnight, I buffed on a couple coats of wax both inside and out. Here's the finished boat shelf!
It was a good project and came together as we envisioned. KT's parents liked the gift and we look forward to seeing it hanging on their wall.


